Uncategorized

Soft-Marblesheen

Meet Michael, Hes Got a (pool) Problem

Damaged Marcite

Meet Michael, Hes’ Got a (Pool) Problem

Michael has a great (large) pool, and it has served him and his family well for over 15 years, but now it’s showing its age. Being Marcite it started out well enough as they usually do.  However, being a reactive surface (meaning it reacts to some of the chemicals you must put in your pool, notably acid) it slowly dissolves.

Michael noted that in recent times it was getting harder to keep algae under control. To keep ahead of the growth, he was adding more and more (expensive) algaecide to the pool water. This not only costs money, but it’s also not that good for you in large doses. He started feeling a little unwell after each swim.

Also, the pool surface was getting more stains and becoming quite unattractive to look at.

First off, he is going over the surface to see what issues there may be. From stains, and worn areas, and to drummy (hollow sounding when tapped) Marcite. Mark any drummy areas with a black marker pen – pencil for future reference.

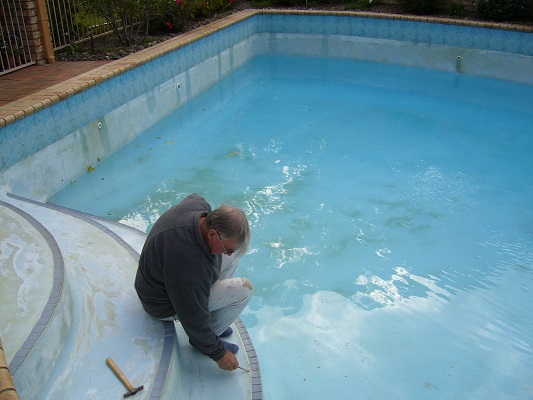
Though Michael was a careful and responsible pool owner (his young grandkids came over a lot in the summer) there was a niggling worry about them and all these chemicals too. So, one recent winter he decided to do something to get his pool back to how it used to be when new.

After a lot of research and talking to local pool shops, contractors, and neighbors Michael finally settled on upgrading the Marcite with a new hard-wearing, easy-clean, and long-lasting, decorative coating. One that will save him hours of cleaning and heaps of dollars with much less chemical treatment. It’s like putting a new skin over the Marcite to provide a colorful finish, a base for murals, one that algae cannot grow on, and is really easy on the cleaning and maintenance side.  This is really important, as Michael was in his early 70s and the thought of any more major work on the pool in his advancing age, is not tenable. By the way, Michael is a retired painter so he understands coatings and was seeking only the very best for his pool. Something that his neighbors and friends were interested in enjoying in their aging pools also.

Removal of damaged Marcite

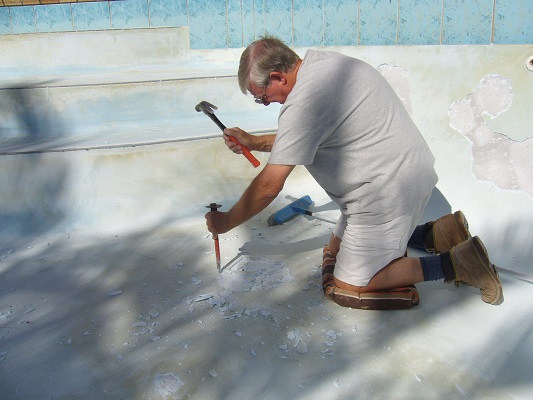
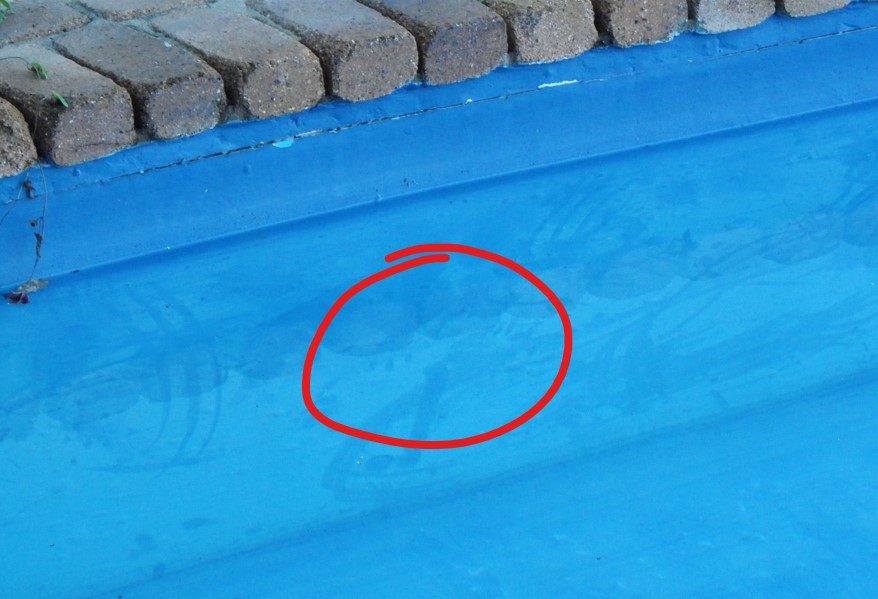
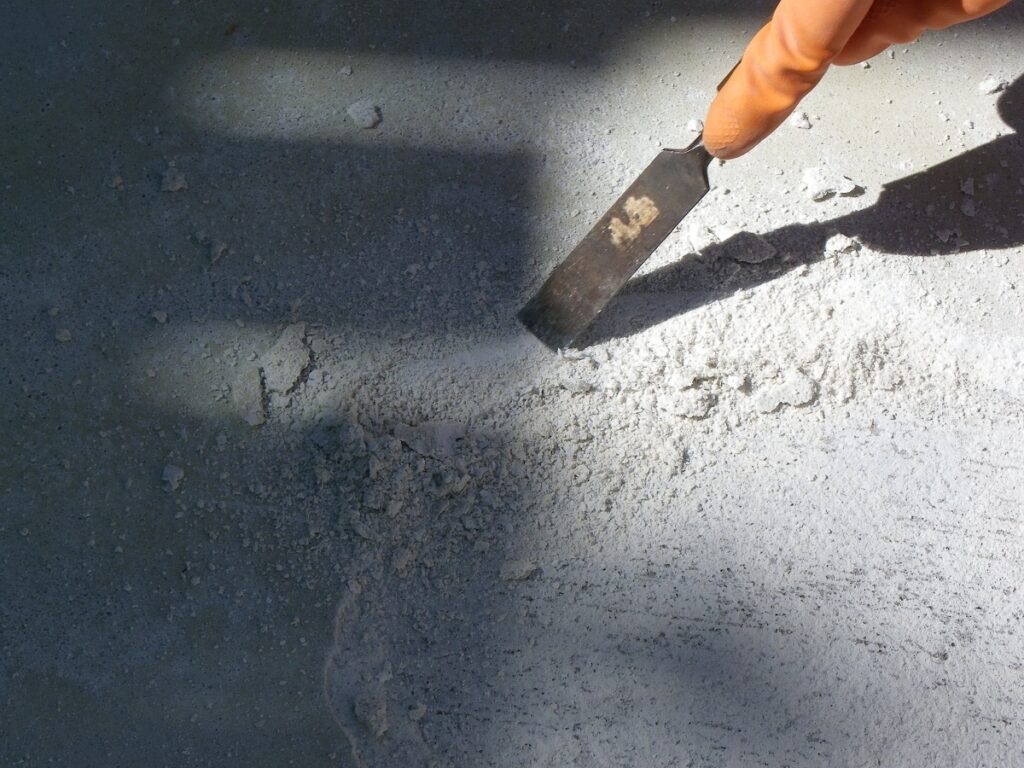
Remove all such drummy areas carefully and do not hit the surface too hard as it will dislodge, stable material on the periphery.  Note well-stained Marcite. These areas do not need to be removed but treated with high-strength algicide to kill the roots.

Area of removed Marcite, concrete beneath

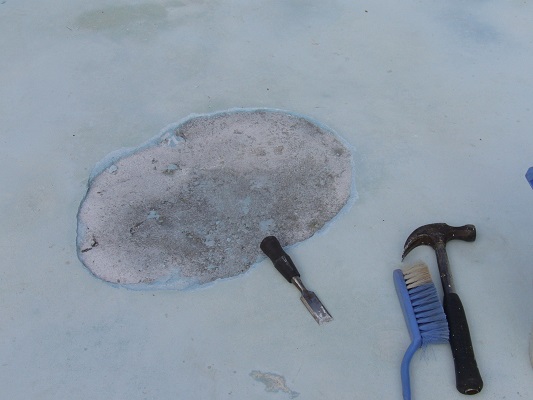
An example of a removed area of Marcite showing an underlying concrete surface.  Note the firm edges left and no cracked material surrounding the area removed. Meaning it’s all well adhered to the concrete, here.

Repairing Marchite, with a suitable compound

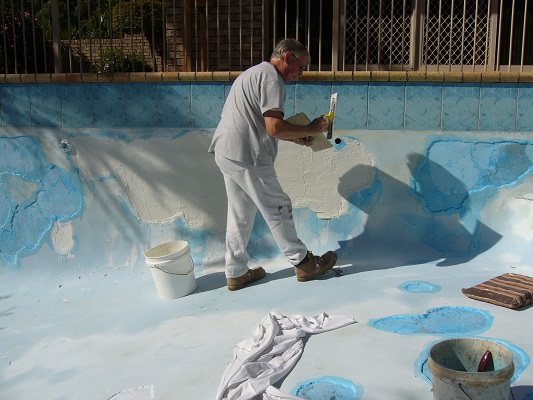
Using a suitable repair compound to re-surface those areas where the Marcite was removed (Michael followed the suggested products listed in the comprehensive Application Notes, on our website – paintnforget.com) The blue areas are the primer to the exposed concrete surfaces, so the repair compound adheres. In this case it’s trowelled flush and fairly smooth. After 24 hours to set, it’s lightly sanded flush to match adjoining areas.

Applying 1st color coat

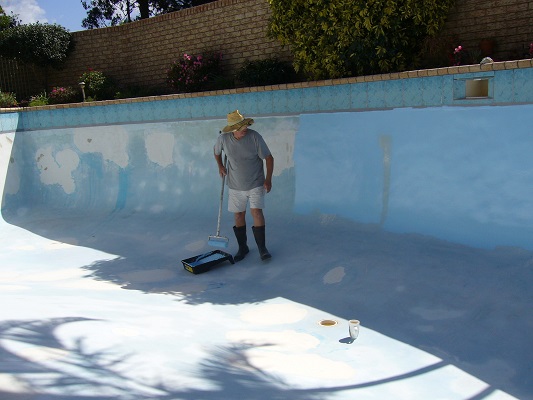
Michael is hard at work on his large pool, applying by roller the first color coat. The surface has been primed with clear penetrating sealer first. Application in warm sunny weather is best.

Applying 2nd color coat

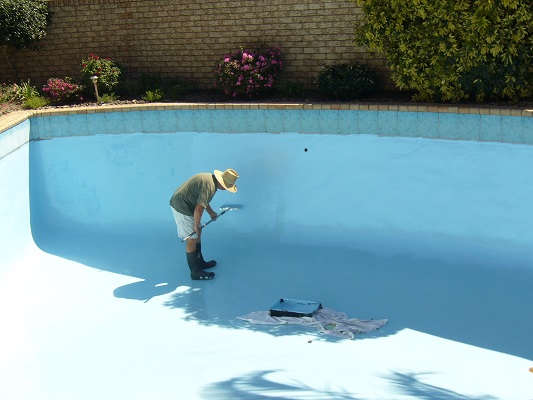
After 24 hours of cure time, the second color coat can be applied. Allow to fully cure before filing with water.

Adding murals

Michael wanted some murals for the grandkids so here is a local artist sketching out the outlines for Michael to color in. This was undertaken a few days after the last color coat was applied.

Completing the murals

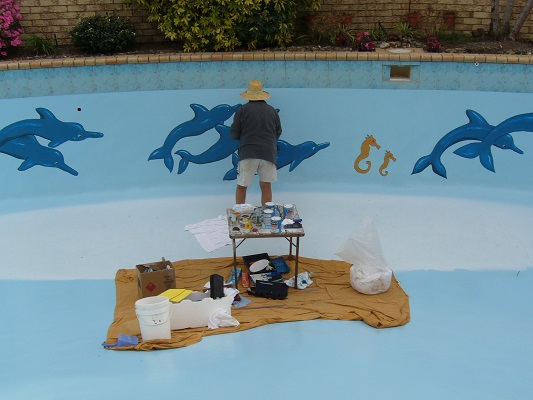
Michael completing the murals with the same material as the topcoat for maximum color longevity and durability.

Ready to swim around!

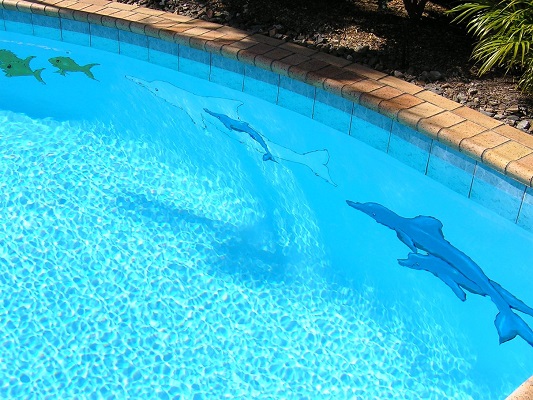
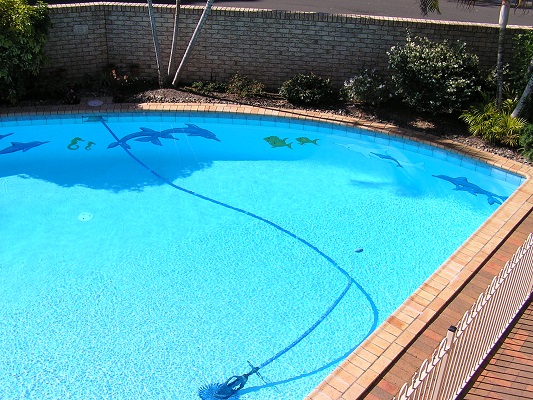
Pool murals are finished and in bright sunlight. The main pool paint color is Mid Blue.

Finished at last!

If you have a pool like Michael’s, ( Marcite, Pebble Tec, Plaster or similar, even Fiberglass,) let us know and we can personally work with you to understand your pool needs, your budget, and your future requirements. Then we will guide you on how to achieve a finish that will meet, indeed exceed your requirements. We like to discuss with you one on one to develop just the right answer for you and your pool. One you will enjoy for decades and be proud to share with friends and neighbors. Just go to Contact Button on the website. We will follow up promptly.

Swimmer in clean water

Why You Should Invite Dr Langelier to YOUR Pool!

Clean Balanced Water – Always

Why you should invite Dr Langelier to YOUR pool!

Pool water will always (try to) find its own water balance. The question is, will this be what you and your pool want or actually need?  There can be unsuspecting actions going on as your pool water tries to get itself in balance. Actions that can make your pool uninviting at best and/or pump parts corroding away at worst.

So, let’s dive in and see what’s really going on here.  There is a desire, indeed a need to get your pool water into balance and then keep it there. This will ensure your pool (always) looks inviting to dive right in and enjoy. In addition, you need the sanitation level correct, the mineral content correct, (pool water contains minerals no matter where your water comes from), and a few other goodies and often baddies, like phosphates.

So, to really help you and all other pool owners a certain Dr. W Langelier developed a complex formula way back in 1936, for the analytical control of anti-corrosion water treatment. This was aimed at the industrial market then; however, it was simplified in 1965 by Carrier of air conditioning fame and has since become very useful for all swimming pool owners as well.

Briefly, it can now tell with a good degree of confidence, whether your pool water is in balance or not, and if not, explain what you are seeing, going on.

One can have a long and lengthy discussion about the formula and the background however rather than blind you with more technical material than you need, let’s focus on the key factors.

LSI  App
LSI App

The Langelier Saturation Index (LSI) needs to be kept always in the range of -0.3 to + 0.3 for a well-balanced pool. You can ask your pool shop to calculate this for you every time you get a water test and make sure it along with all the other parameters they test, like pH, Chorine, Ca and TA, are recorded including the date. Then you can see your pool water chemistry trends and take action in advance of developments. This will save you money.

If you do your own tests at home with a test kit, you can enter the data on your smart app and get the results as well. Search for Orenda LSI on your smart app store and download it. (see image above)

The LSI index predicts the calcium carbonate stability in your pool water.

  • LSI >+ 0.3, then water is supersaturated and tends to precipitate a scale layer inside the pool and filter equipment.
  • LSI -0.3 to + 0.3 generally in balance with no significant activity.
  • LSI <-0.3, then water is undersaturated and tends to dissolve solid CaC03 (Calcium Carbonate)
  • The LSI index is temperature sensitive, and the higher the temperature of the (heated pool) the greater the LSI becomes. So, you need to determine pool water temperature along with, the Calcium Hardness, Total Alkalinity, Total Dissolved Solids, and any Cyanuric acid in your pool water. These factors are determined at your pool shop water test, automatically. If doing home testing you need a test kit that covers these points also, not just a basic test kit.

So, you can see by making only a few changes here (Water temp, pH, TA, Ca) the LSI varies. In red the readings are too low or in orange too high, in green, acceptable.

By tracking the LSI over time and with the other factors also recorded, you can discover your pool’s trends, as the seasons change, or bather load etc.  Then know what to do in advance of the LSI getting too low or too high and make adjustments to the chemistry. This will usually save you money as the corrections are less, and thus use fewer chemicals to keep in balance etc.

In the above example take column 3, the green result. So if we see the TA starting to raise we know that the LSI will also increase, all else being the same.  Then we can take steps to reduce TA before it gets so high as to cause the LSI to go above +0.3. (This can be affected by adding some acid to your pool) And if you see the TA heading towards 120, then the LSI will be +0.32 already, so its time to add some acid to bring it back, rather than waiting till its at 190 (in examples above) and having to add a lot more acid.

This is why testing your pool on regular basis (weekly summer, monthly winter) is so helpful once the LSI is known. Then you can be Pro-Active.

What does scaling mean?  (LSI greater than +0.3) This means that calcium carbonate is deposited (dust, powder) on the pool surfaces, inc fittings, plumbing, and filtration equipment.  Naturally, the higher the number the more of this scaling occurs and it can be very noticeable, as a fine white chalky like powder. (see image below)

White Calcium Deposits On Surface

The pool water may look cloudy – murky as well. If you run your fingers across the surface, you can see the finger lines on the surface, and there may be color pick up even, as the scaling is quite abrasive. The pool water vacuum units may have a powder or color pickup also as they travel across the surfaces. There can be damage and build-up within the pump units and pipes leading to reduced flow and added work for pump motors.

Thus it is very desirable to not let this happen, as once it has taken hold, getting the scale off some surfaces can be quite difficult and the damage may be done already.

What does dissolving (corrosion) mean?  (LSI less than -0.3) If your pool is in this state then the pool water will seek out Calcium Carbonate (CaCO3) to rebalance it back to 0. So where will it get the CaCo3 from? It will start with any cement surfaces in your pool, inc Marcite, Pebble Tec tile grout, and plasters in general. They will be etched away before your very eyes, making a rough, friable, soft surface, so that algae take hold. Replacement is needed. Oh, I have a fiberglass or liner pool, then you need to look at the surfaces and you may well find a degradation going on. Also, in the plastic pipework too.  Meaning shorter life than expected.  Water STOPS AT NOTHING to find balance. So don’t think you and your pool are immune from the ravages of a low LSI.

Important: Today if ALL your readings are fine, this does not mean they were fine and in balance yesterday nor tomorrow. They can be out of balance for days or weeks and the damage is done. Now you will pay for it. Hence the need to do regular tests inc LSI and record the results so you can easily see them. Your pool needs to be in LSI Balance year-round for worry-free pool chemistry.

A good supplier of pool water test kits is Taylors. See here   https://www.taylortechnologies.com

Suggest the 9-way test kit is the most useful

And make sure whoever does your pool water testing knows their chemistry very well!

Here is a more detailed article from Orenda on LSI, I suggest you check it out.

https://blog.orendatech.com/calcium-misunderstood-chemistry

Now You Understand LSI , Right? – Just Enjoy Your Pool!

Use pool fence to reduce cleaning and gain other benefits

Pool Area Wooden fence

Use A Pool Fence To Reduce Cleaning Needs

If you have a pool, you need a pool fence, as it is the law basically everywhere.

However, with some careful thought, you can add more features to save on pool work at the same time.

A pool fence adds:

  1. Security: to keep younger and non-swimmers safe from falling in. It may also be helpful in keeping family pets on the right side as well.
  2. Privacy: If your yard is open to view from the street or neighbors, then with the right design I can increase your privacy considerably. Meaning no matter how you look, you can enjoy your pool.
  3. Being Lawful: Depending on where you reside, local laws may mandate you need a pool fence to meet local standards. Do check to be sure.
  4. Convenience: Depending on needs, a pool fence may offer a better way to protect the pool, when a cover is not possible or difficult to install and use.
  5. Insurance savings: your insurance company may offer a discount depending on your policy or may even require a fence. Check it out.
  6. Critter protection:  If you need to bring the fence to ground level and keep all these pesty critters away from your large water hole. A solid 5 ft high fence will keep most jumping animals at bay also.
  7. Reduction in pool cleaning needs: If a solid fence from ground level to 5 – 6 ft high (glass) then not only will critters and animals be kept out, but it will also reduce low-level dust, sand, and leaves being blown into your pool. This will save on cleaning time and costs. Of course, overhanging trees are still able to drop their residues.

Save Money At Night

Turn the night into money saving activities

Pool In The Night

So easy to set up and save you money. Start tonight.

You can save money at night by running your pool pump on off peak electricity. Just note whether your pump will disturb you or your neighbors sleep though. If need be, acquire a soundproof cover to ensure everyone gets a good nights sleep, while your pool pump and filtration system does it thing.

Another approach is to look at a variable speed pump.

So instead of say operating your pump 6 hours in every 24 to turn over the pool water once, a variable speed pump runs longer, but at lower speed and consumes less electricity. One example compared a normal pump of 2000 watts running 6.3 hrs per day and consuming 12.6 kWh, per 24 hours. A variable speed pump running 19 hours on 116 Watts consumed only 2.2 kWh’s per 24-hour period.  A saving of 10.4 kWh. So, this maybe another way to save, run longer but at lower speed. The variable speed pump will cost more initially but runs quieter and over a year will probably pay for itself. Go, check them out.

Turn Off Water Features

Pool Waterfall

You can Save by turning off water features too

If you have water features (waterfalls, deck jects and even fountains) these add ambiance, but they also come at some cost. So, when not using your pool, best to turn them off.

Waterfalls will be cooling your pool water as well, meaning more heating is required.

All of them generate more evaporation and thus added costs for water and chemical replacement will be needed.

If they are part of the ambient sound, you enjoy, look at putting on a time switch or daylight sensor to reduce the power usage.

If you have a larger waterfall, maybe there is a possibility to turn off this ( when the pool not being used)  but create a mini one in the same area to maintain the sound ambiance, with less running costs.

Thinking outside the box can save you money, but maintain most of what you desire.

Steps To Removing Your Pool Cover.

Steps To Removing Your Pool Cover.

Pool in Spring

This is something you can do (with a helping hand from family or friends) and save a lot of money in the process. It’s a step-by-step project, and though quite straightforward, is not always fun.

Note there are 3 types of pools covers in use: Tarps, Water Bag Covers and Safety Covers which are becoming more the norm. If you have a safety cover then much of the first few items below will not be applicable, as you will have an easier start. Of course, if you have a retractable cover its easier still.

  1. Remove (scoop, broom) all lose floating leaves and vegetation off the pool cover.
  2. Pump (submersible) the standing water off the cover, being careful not to let to get clogged with those leave you left in the middle. Connect the submersible pump with a garden hose to a drain.
  3. As there may be a quite a lot of water in the center of the pool cover, it can take a day or 2 to get much of it off, work on about 1 ins per hour at the deepest point. But leave enough water remaining (3 – 6 ins) so the pump is not clogged up with the sunken leaves etc.
  4. Armed with a cheap deep leaf net, you now remove all of the leaves on the cover.
  5. Once you have done you best, drill a heap of ¼ ins holes in the sides of a 5-gal bucket to act as sieve, once you place the pump inside and turn on again.
  6. Continue scooping the leaves off your cover while pumping away. Soon enough you will start into the sludge on the pool cover. This will become difficult to remove as muddy wet and difficult to remove from the leaf net. So, with some large trash bags (with a few holes in the bottom) sitting in a large container also with drain holes in the bottom, fill these bags with the leaf sludge. Eventually they will drain out and the bags can be disposed of (or put contents on your garden)
  7. Ready to remove the cover?  Not yet as if you do with all the remaining leaves and water, will end up on the floor of your pool. Meaning another big cleanup.
  8. So place the submersible   pump near one end and then from the other end, use a hose and some detergent, coupled with a (telescopic) broom to remove the dirt, sludge and slime. And make sure you are pulling (not pushing) all the material towards the pump.  As you work the water will clear and the process will be successful. You can use just water once the surface is clean enough, not spotless. After a few repeats, it will run clear.
  9. Now you are ready roll up the cover, having removed all dirt and (99%) of the water and then the pump. Start at the other end (from where the pump was) and drag the cover past the end of the pool and fan fold * the cover, on the perimeter are outside the pool.  You will need 2 people to do this.
  10. For the last section lift out manually so as to prevent any remaing in resiudes dropping into the pool.
  11. Once rolled up like a sleeping bag, stand on ends (like an inverted U) so as the water runs out and it dries. After a few days its ready for storage out of the weather till next fall.
  12. When its time to winterize your pool, then you just unroll in the reverse manner, and it will be much easier to set up.

*Fan fold creates an accordion style folded cover rather than the fold in half and then  fold in half again etc.

The 7 Steps To Follow On Your Pool Reopening

The 7 Steps To Follow On Your Pool Reopening.

Its Time To Check Your Pool Equipment And Add Ons

Now that you have removed the cover and cleaned up the mess, the next step is to fill the pool, check equipment and add chemicals, before you (and the kids) can dive in.

The first things to do are go find all the items you removed from the pool at shutdown. Clean as needed and replace. This will include reinstall lights, eyeballs, ladders, handrails, skimmer baskets etc. You may need to allow a day for all this work, depending on how fast you proceed and the extent of checking and cleaning etc.

2. The pump and related equipment should be checked over. Cleaned up if needed. And don’t forget to replace the winterizing frost plugs, carefully. Once down be ready to prime the pump also.

3. Filers will need to be put back together. Hopefully you left it clean before the winter started. If in doubt consult the owner’s manual for all the details so it’s back to gather in the correct way. Don’t forget to re install filter tank drain cap, near its base.

4. If you have a pool heater fitted this is a bit more complected to recommission. If in any doubt book a service technical (early as they will be very busy at this time) to come and check, clean and restart for you.  Best they come once your pool pump is up and running.

5. Saltwater cells are generally removed for the winter and the reinstall should be quite straight forward. Just make sure you get the O rings replaced and lubricated ( non-petroleum based lube), the cell is affixed in the right direction ( of any arrows) and the wires re connected to the controller. Note you will need to determine how much salt content is in the pool after the winter in order to add the correct amount on start up. Also note that the pool water temperature will need to be high enough for the cell to function correctly.

6. Pool lights will need to be carefully re affixed as the plastic fitting and associated materials will be soft, after a few years of immersion. The screws (brass – bronze) are often part of the electrical bonding circuit so must be replaced with the same type, in order to carry  out their electrical function. Take your time and be careful in reinstalling including the wires and do not damage any parts. Else replacements or whole new fittings will be needed.

7. Pool ladders and handrails can be troublesome to re fix, especially if you are not so familiar with the techniques.  Take your time and have the right tools to refasten the bolts etc.

Use A Pool Cover

Swimming pool cover for protection against dirt, leaves, heating, and UV.

Save  Money and Effort With A Pool Cover

If you want a BIG return on a small investment, then a pool cover is the place to start. Why?
When your pool is covered, you are going to benefit by:

  1. Reduced energy costs.
  2. Reduced water replacement costs.
  3. Reduced Chlorine treatment costs.
  4. Less cleaning needed, (costs)
  5. Safety will be enhanced with potential savings there too.

How Do I Save Energy Costs?
Simply put, a cover will reduce the heat transfer at night out of your pool, meaning it retains more heat and will thus need less heating. This will be most noticeable in cooler climates and at the beginning and end of the swimming season, when you require heating to extend the swimming season. Your pool heater will be working much less and save you energy costs, more so now as prices are high. You can enhance this feature by making use of a solar pool cover.
So how effective is a solar blanket?
It will enhance your swimming experience to varying degrees depending on a few factors. As an idea if your pool gets 6 hours of direct sunshine then you can look forward to a rise in temperature of 10 – 15 deg F. Very handy.
And at night it will keep the pool warmer as well, by restricting the amount of heat loss.
A university study found that for an outside pool a saving of over 30% was achieved on pool heating costs.
So go and get a pool cover and start saving now.

What To Do About Water Evaporation?
Water evaporates from your pool and the hotter and windier the conditions the faster this occurs. And lower atmospheric humidity, only adds to water loss.
Water charges can be high and to have to top up your pool every few days soon adds up to significant costs. And not only this, but the added water, depending on where it comes from, may upset the established chemical balance in your pool also. Meaning more costs.
So, a pool blanket will reduce this as well. Want to know by how much? Cal Poly Studies on many different pool banket type covers established that with any of solid track covers, foam covers, bubble covers you can expect a 90+ % saving in water evaporation rates. A big deal if you in a dry, expensive water location.
Stop Your Chlorine Loss.
All things being equal, in your pool, the largest degrader of the effectiveness of your pool chlorine is UV light from the sun. An easy way to prevent or significantly reduce this is with a pool blanket. So, you will need to add less chlorine reducing both time and money spent. If you have a saltwater pool, then your chlorinator will work less saving energy costs also.

Bubble Pool Cover

You Mean Less Cleaning Also.
Yes we do! Your pool is open to the world and everything passing by can drop in. From nuisance leaves, twigs, seeds and cones. Then there is windblown dirt, dust, sand and spores. The vegetation material will decompose and usually provide a great nitrogen base for algae to take hold in every nook and cranny. Before you know it, your pool is green and developing the hanging gardens of Babylon!
Leaves on the bottom will mean more cleaning of the leaf collector in your automatic pool cleaner, more work.
Leaves that don’t drop to bottom, will tend to block your skimmer basket and be a mess to remove every day. Such blockages reduce pump efficiency and add to the costs of running it.
Oh, and what about bird life pooping into your pool to accelerate the greening?
Lastly the added organic load in your pool, means your pool chlorine is used up faster trying to maintain safe and healthy pool.
Want to save on these costs and hassles, go with a pool blanket. It’s easy

Improving Pool Safety

pvc pool shutter to conserve heat and protect from accidental falls

Depending on the on the type of pool cover you can significantly enhance pool safety when the pool is not in use. The automatic pool covers offer the best protection against accidental pool entry. A mesh type will be second choice, but unless you have a “bubble” cover underneath, it will not offer any advantages re chlorine, evaporation and leaf dropping savings.
A floating “bubble” type banket is not in of itself a safety cover, against accidental pool entry.

Save Money With Solar Pool Heating

Solar Pool Heating

Save Money With Solar Pool Heating

Let The Sun Save YOU Money

Want to extend your swimming and fun season?  Well yes I want to heat my pool, but what’s the best way?

You can use gas or electricity to heat you pool. These can be expensive and so to save money, you need to turn down the temperature.  You can make sure you have and use a solar blanket to reduce heat loss also. But at the end of the day the warmer the pool and the longer you want to keep it swimmable, the more money you will be burning up. Until that’s solar heating is used.

If you want to significantly reduce your heating energy bill, solar offers a very easy way to do so. The install cost of solar is very competitive with either gas or heat pump installs, but it has the added factor of being essentially free thereafter. No rising energy costs to contend with.

Even in a cooler climate you will get useful energy for pool heating well into the fall. (Do look at the location and direction of the solar collector device installation and any shading trees. These all can impact of the efficiency of the install).

So how much extra warmth can I expect?  As general rule you can look to gaining an extra 8 -12 degrees F, over an unheated pool. Of course, there will be heat loss at night (use a solar blanket to minimise) and on cloudy days also.

And how much solar collector do I need?

Generally, about 50% of the pool surface area. So, a typical 30 x 15 ft pool has 400 sq ft, so you will need 200 sq ft of solar collector. You can have more solar collector.

Id like more details, where do I go? Click here

https://www.energy.gov/energysaver/solar-swimming-pool-heaters#:~:text=You%20can%20significantly%20reduce%20swimming,solar%20energy%20in%20some%20climates.

  • Smart Pool’s S601 Pool Solar Heater. It is no wonder that the S601 Pool Solar Heater is ranked first in our list of the best 2022 solar pool heaters. …
  • Fafco Solar Powered Heating System. …
  • Game 4721-BB Curve Solar Pool Heater. …
  • SunHeater S120U Universal Solar Pool Heater.

Robotic pool vacuums

Robotic Pool Cleaner 1

Robotic pool vacuums

Save With Automatic Pool Cleaners

Okay so you have your pool and you have been self-cleaning your pool to save money.  Starting very enthusiastically and slowly it becomes a daily chore, then a weekly hassle and finally only as needed, if then. The trouble is your pool is taking longer to clean as your enthusiasm wains and the pool water balance becomes more complex and the chemicals needed increase. I slow spiral into a black or green hole.

But all is not lost, there are robotic pool vacuums to rescue you and your pool.

These generally remove more dirt and debris from your pool than other cleaning methods. If you use them, it will save you the need to engage a professional pool service – cleaning company as well.

And it will save you time and energy as for most pools the job is done in 3 hours.

How to Select The Right One

Robotic Pool Cleaner 2

There is a considerable range of such cleaners so check with your local pool shops for ideas and recommendations. 

Selecting the right unit for your pool will take a little knowledge and understanding. Knowing the pool surface is the first step (fiberglass, tiles, paint etc, meaning smooth and slick) select a soft super grip PVA type bush.

For more textured surfaces, (plaster, Marcite, Pebble Tec etc) look for a cleaner that has wheeled or universal PVC brushes works best.

And don’t afraid to seek feed back from neighbors with similar pools to yours and what they use and find works best.

Then you need to figure out you are wanting; just the floors, or walls too and swim outs and so forth to be cleaned. So, you can sit back and watch them do all the work!

Lastly you may already know areas in your pool which seem to collect stuff and its important they get to these areas and do a good job.

Some types can get stuck behind steps, in sharp radius inside corners, and on swim outs and ledges. So be clear in your pools’ needs, before selecting the right unit.

A few other aspects to be aware of:

  • Suction power, ideally 70 GPM or above
  • Micron Value, the lower the better for the filter, as removes the smallest particles.
  • Power Wash, can be helpful if your pool suffers from sand or fine silt blowing in
  • Warranty, you want it to last so a well designed and constructed unit will have a decent warranty. 2 – 5 years. Keep away from cheap and flimsy no matter the price.